- How to break down screenplays, rundowns, commercials and non-fiction scripts

How to break down screenplays, rundowns, commercials and non-fiction scripts #
Dramatify’s Breakdown tool lets you efficiently break down all script formats – screenplays, rundowns and AV scripts – for drama, entertainment, shows, factuals and commercials.
The breakdown is fully integrated with Scene Item Management, Characters (including wardrobe, makeup and hair), Sets, Locations, the Scene list and Story order, Planning & Scheduling, and Call sheets. You can also use AI to automatically breakdown your script. You can work traditionally with one AD or line producer, or make it a collaborative workflow by allowing departments access to the parts relevant to them and avoid double-work.
Before you start #
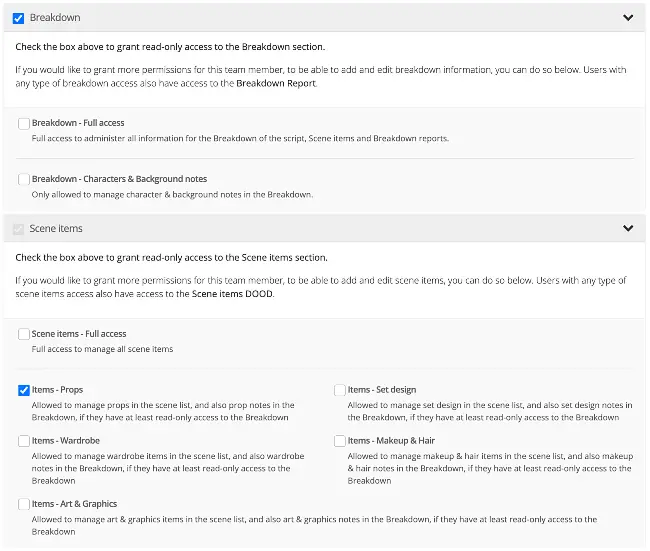
Access and department-specific permissions #
To work with breakdowns, users must have at least Tailored access to the production. Learn how to set access.
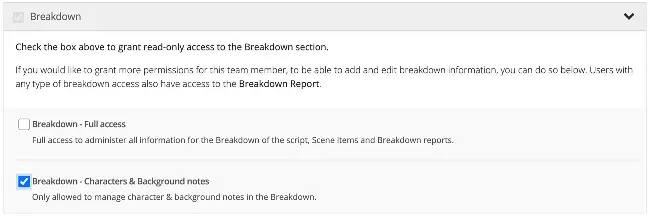
Full access to Breakdown #
Crew > member name > Edit > Breakdown > Full access
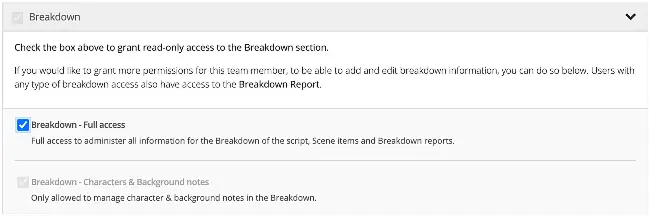
Partial access to Breakdown #
You can grant limited, department-specific breakdown access so individuals only work with items in their own departments:
- Props
- Set / Scenography
- Wardrobe
- Makeup & Hair
- Art & Graphics
With limited breakdown permissions, users can:
- Add scene items and notes in their own department
- Read — but not edit — other breakdown information
Characters, Stunts, Extras & Background cast: Users with limited access in this category can only add notes, not change which characters appear in scenes. This allows directors, coordinators or casting to annotate without altering the creative breakdown.
Breakdown of imported screenplays vs. scripts & rundowns written in Dramatify #
When writing directly in Dramatify:
- Screenplays: You do the breakdown from scratch.
- Rundowns / AV scripts: Pre-filling depends on whether you already linked characters/cast and sets.
When importing screenplays (.fdx / Final Draft):
- INT/EXT, Time of Day and Set usually import correctly.
- After import, check your Stripboards to confirm scenes look correct (see below).
- Fix any scenes with unusual or unclear INT/EXT or Time of Day.
- Review scenes with missing sets.
Story order stripboard: The striped background #
A striped background on a scene in the story order stripboard means key breakdown information is missing (e.g., no Time of Day, no Set, unclear INT/EXT). You will see it in Breakdown, the Scene list, Scheduling and Call sheets.

Navigating the script breakdown #
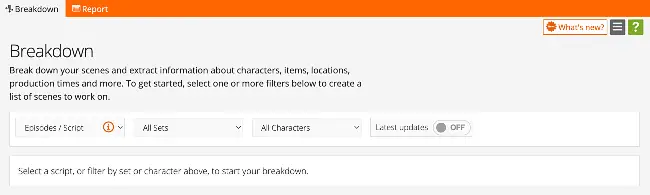
Open the Breakdown page and choose your view #
To begin:
- Click Breakdown in the sidebar.
- Use the filters to choose how you want to work. You can filter by:
- Episode / Script
- Set
- Character
- Latest updates (scenes marked with an orange badge)
- Filters can be combined — for example, one episode and one set.
Open a scene’s Breakdown sheet #
- Apply your filters.
- The list of scenes appears.
- Click a blue scene header to open the Breakdown sheet.
Note! If no scenes show, nothing matches your filter selection.
Final Draft (.fdx) import markers #
- Scenes updated in the most recent import display an orange icon.
- On first import, all scenes show the icon.
- You can configure how these markers appear in the importer.
Navigating the Breakdown sheet #
- Click the double-arrow to return to the scene list.
- Use the scene dropdown to jump between scenes.
- Use Previous and Next scene.
- Keyboard shortcuts:
- Mac: Cmd + Arrow
- Windows: Ctrl + Arrow
Most sections are collapsible to reduce scrolling.
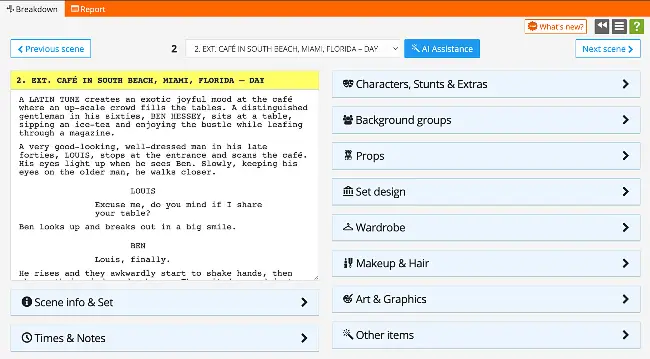
The Breakdown menu #
Open the menu (three parallel bars) to:
- Flag a scene that need fixes, attention or approvals—shown on the breakdown list page
- Bookmark a scene for quick access to important scenes—shown on the breakdown list page.
- Copy elements from another script or scene:
- Characters
- Background cast groups
- Scene item groups
- Split / Un-split a scene part
Starting basic script breakdown #
Add Scene info & Set #
Below the script text area, you’ll find the Scene info & Set box. For planning, scheduling and call sheets to work smoothly, ensure each scene has at least a Time of Day and a Set.
- Click the pencil icon.
- Update or add:
- INT/EXT
- Set
- Location
- Time of Day
- Script Day
- Synopsis
- Pages (Note! Use the page calculate button if you wrote the screenplay in Dramatify or after changes that affect length. Default Final Draft page division is 1/8 of a page. i.e including more white-space. Dramatify’s default page division is 1/16 of a page (i.e., more exact).

Add times and notes #
Time estimates #
Add time estimates for more precise scheduling, and time estimates. Timing feeds into Story Order, Running Order, Shooting Scheduling and Call Sheets.
- Estimated shooting time
- Estimated working hours
- Episode duration
- Durations per selection (sets, script days, etc.)
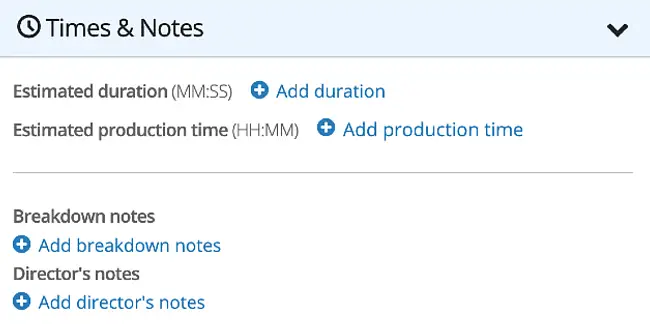
Notes #
Use notes for important details:
- Breakdown notes
- Director’s notes
- Scene-part notes (for split scenes)
Notes appear in reports and stripboard views.
Add Characters, Stunts, Extras & Background cast #
Dramatify supports characters for all production types.
Imported characters #
- Characters with dialogue are imported automatically.
- Non-speaking and atmosphere/background characters must be tagged before import (or use the AI script breakdown, see below).
- Always double-check scenes for missing characters.
Move characters between speaking and non-speaking #
Drag characters between lists to change their status per scene.
Add an existing character to a scene #
Start typing their name, then select from the suggestions.
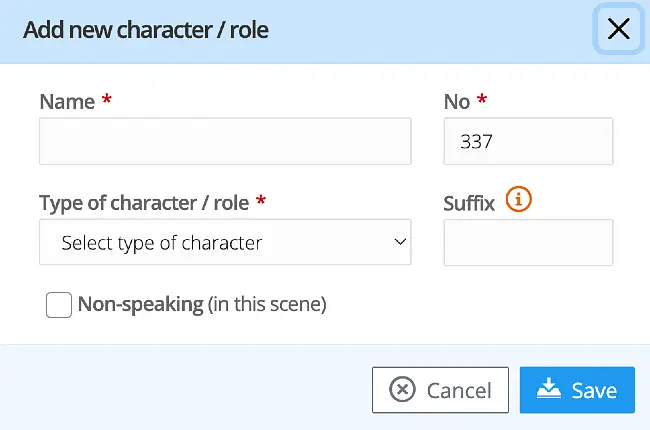
Add a new character #
- Click Add new character.
- Enter name and optional character number.
- Select a character type.
For body doubles, stand-ins or stunt doubles, use a descriptive suffix.
Background (Atmosphere) cast groups #
These are always added as groups, e.g.:
- 15 police officers
- 30 café visitors
- 20 spectators
Important:
- Background cast are not invited to Dramatify.
- Wardrobe and Makeup & Hair cannot add individual items to background groups.
- If individuals need detailed wardrobe/makeup, add them as Extras.
Add Scene items #
Scene items can belong to the set, the character or the scene— such as props, wardrobe, hair & makeup, but also music, a necessary security detail, and equipment, basically anything required.
How scene items work #
Permanent scene items
- A scene item belonging to a set: The item is automatically added to all scenes with that set.
- A persistent scene item belonging to a character: An item that follows a character (e.g., glasses, scars) and appears in all the character’s scenes once added.
Temporary scene items
- A scene item belonging to a character: Add items to each scene, as outfits may change. You can click the breakdown menu and copy items from a previous scene if you’d like to.
- A scene item belonging to a scene: An item not belonging to a character or a set.
Add scene items in the Breakdown sheet #
- Click Create new item.
- Or type to search and add existing items.
- Click Scene items in the sidebar menu to view previously added items.
Advanced script breakdown #
Split scenes in the Breakdown #
Scenes may need to be split due to location changes, cast availability, VFX, or simply because a lunch break is required. Note! Only screenplay scenes can be split, not rundown or AV script scenes.
- The scene script and scene header do not change for split parts. You can change all other parameters.
- Lists and stripboards sort and filter using the updated values you define.
- Use scene part notes to highlight special conditions.
- If you need unique headers, create a new scene in your script before import or edit the script directly in Dramatify.
Splitting in Breakdown vs. Scheduling #
- Breakdown: Full control (Set, Location, Time of Day, Characters, Scene items, Synopsis, Notes).
- Scheduling: Lightweight splits (pages, duration, production time). Click the upper-right corner of a scene and then click the Split scene into parts button.
How to split a scene in breakdown #
- Open the scene in Breakdown.
- Open the Breakdown menu.
- Select Split scene.
- Parts are numbered like 1:1, 1:2, 1:3, etc.
After splitting
- The original scene is hidden.
- Elements copy to each part (except time/page values).
- You are moved to Part 1.
Un-splitting and deleting scene parts #
- With two parts → un-splitting restores the original scene.
- With three or more parts → deleting removes only the selected part; others renumber.
- To fully un-split, delete until two remain, then un-split.
- Deletion cannot be undone.
Speed up your work with AI assistance #
AI can help accelerate your breakdown work.
- Open a scene’s Breakdown sheet.
- Click AI Assistance.
- Choose:
- Strict mode – Adds only elements explicitly in the script—recommended for drama and fiction.
- Creative mode – Suggests implied or likely elements—recommended for entertainment and non-fiction.
- Review suggestions:
- Accept useful items.
- Remove anything incorrect.
- Add or edit manually as needed.
- Click Save or Save & Next.
You receive free AI credits; more can be purchased by clicking your company name in the upper right corner, then Billing. Note that only company administrators can access Billing,
Add scene items outside the Breakdown #
You can add scene items directly to sets, characters or in the Scene item list. This is helpful for team members who do not have, or should not have, Breakdown access.
Permissions outside the Breakdown #
Any of:
- Scene items: Requires Scene items Full access
- Character page: Requires Creative access + either Character details Admin, Wardrobe or Makeup & Hair.
- Set page: Requires Creative access + Full Access – Set.
Breakdown Report #
Learn more in the Breakdown Report How-to.
