Working with multi-camera live/studio scripts & rundowns!
World's smartest entertainment scripts! Sign up if you haven't already!Working with multi-camera live/studio scripts & rundowns!
Our scripts and rundowns for multi-camera live and studio scripts are unique on the market. Here is how to efficiently work with them.
Where do I find the rundown functionality?
Just click on Scripts in the sidebar menu, and select “Multi-cam script / Rundown”.
Note that if you have set up your production to have episodes, you will have to add an episode to create a rundown, or click on “Go to Script” in an existing episode.
In which languages can I write?
IMPORTANT: The different features of the rundown
To fully appreciate the steps below, it’s important to understand the different features that are integrated into the rundown:
First, Dramatify offers two different views for writing a rundown script:
- The script view which is created for distraction-free writing and usage for scriptwriters, journalists, hosts and anchors. This is selected by default when you first start a new production. To switch content writing to the rundown view, go to Rundown > menu > Script settings and switch content editing to the rundown view.
- The rundown view which is created for directors and technical staff.
When the script view is engaged, adding, editing and deleting content, i.e. scene action and dialogue, is done using the script view. In the rundown view, the technical parts can be added and edited such as adding source, camera, sound etc. Access to both parts can be restricted. For instance, journalists and scriptwriters may only be able to write and edit action and dialogue in the script view and then have read-only access to the rundown.
Secondly, there are various input and output options for the rundown:
- Camera cards are available in the Camera Card tab, reflecting the rundown exactly.
- Cue Pilot cue files can be imported, either per scene or for an entire show.
- Cue Cards can be created either for digital devices or for print with a few clicks.
- A “dark mode” feature that switches to dark colours for the rundown so it can be displayed in a studio setting for paperless production flow.
- A read-only version of the rundown can be created for users without a Dramatify account through a “secret link” and/or QR code. (Requires an unlimited or enterprise plan).
- Text files can be exported for teleprompters, subtitling, closed captioning and translation.
Permission and access rights for rundowns
How to set permissions
You can either set permissions and access rights for rundowns when you invite a new member to your production or after you have added them.
The functionality to add permissions and access rights are on the first page when you invite a new member, under the section “Permissions“.
If you want to change permissions for an existing member of your production, you click on :
- Crew in the sidebar menu for crew, or
- Cast & Characters in the sidebar menu, then click on Cast in the orange toolbar for cast, and
…find the team members profile card. Click on the menu button (1) and select Edit member details (2).

Permission to read rundowns
Underneath the Permissions headline on the member admin page, you’ll find Script permissions.
Only members that have Scripts & Episodes > Read-only box checked have access to read and print the rundown.
Note that all team members can read the scene text in the digital call sheet on the day that scene is being shot, under the heading “Shooting Schedule”.

Write and edit the script view
The “Content Editor” role only gives access to the Script view to add, edit and delete script content but not affect script settings nor the technical rundown script. They can also create cue cards under the script view and they can READ the rundown.
Write, edit and delete
Only team members who have the permission box “Scripts & Episodes > Full access” can access edit mode and write, import and edit a rundown.
Check who can read and edit a rundown
To check who can read and edit a rundown, click on the menu button above the rundown and select Access.

In the popup list, you can first see who has Read-only access. To remove their access, just click on the red button to the right.
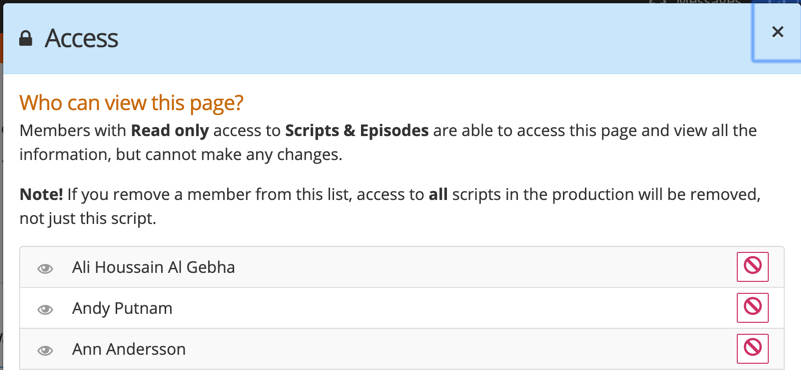
In the middle of the page, you can see who can write and edit a rundown. People with a pen icon before the name have read and write access to scripts, while people with a key are admins who have access to all parts of the production. To remove write access to scripts, click on the red button to the right. The person will retain read access and move up the list to the Read-Only section, where you can remove Read-only access as well.

To change permissions for people with Admin access, access their personal cards under People as described above and remove admin access.
Personalise your rundown view
In the multi-cam rundown, you can both customise the rundown itself for everyone, and personalise what you see by showing or hiding elements.
To customise the entire rundown for everyone, go below to “STEP 2: Rundown settings – select your content“.
To personalise the rundown for you personally, click on the menu button in the top right, and select “Show/Hide”.

You will then see the Show/Hide control panel at the top of your rundown and can select what you want to see. The choices you make will also transfer if you print the rundown.

Change the text size
Click on the menu button at the top, and select Text-size.

You will now see a slider appear at the top of the page where you change the text size to smaller or larger of the page by sliding it. Try it out!

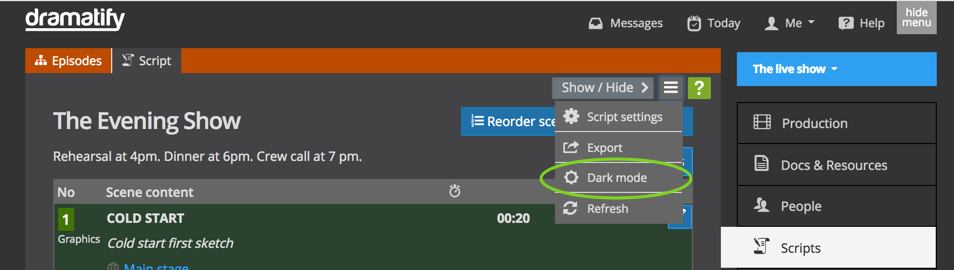
Dark-mode view for shooting
To switch to dark-mode, just go to the Edit menu to the right and click.

Click on Dark mode in the dropdown menu.
Multi-script productions – episodes and series
If you work with a series, please learn more about how to work with episodes and series.
CuePilot integration
CuePilot is “The first-ever dedicated software for live TV shows and events”. You can see the result of CuePilot in the “music video editing” of large shows like The European Song Contest. Cue Pilot allows you to test and plan vision mixer edits, as well as cues to performers and stage staff.
You can add CuePilot files to Dramatify’s rundowns to have everything in one place. You can both link Cue Pilot and Dramatify together as well as manually upload a CuePilot shot list to the entire rundown or just a specific scene.

How to add a CuePilot shot list
You can either create a link between Dramatify and CuePilot and refresh a shot list with a click, or manually attach a CuePilot shot list either to an entire script or just to a specific scene. A Dramatify scene is equal to a CuePilot act.
NOTE! For the import to work correctly it’s important that the Cue Pilot shot list has act/scene numbers and they correspond to the numbers in Dramatify.
Alt 1. Linking Dramatify and CuePilot together
a) In CuePilot, find your project token by selecting the Setup View and then show QR Code and Project Code in CuePilot. Copy the project token.
b) In your Dramatify rundown, click on the rundown menu and select “CuePilot import”.
c) In the popup, paste the project token you got from CuePilot and click “Fetch rundowns”. If you have one shot list in CuePilot that will be displayed. If you have several, you select the correct shot list in the dropdown menu that appears and click “Fetch rundown”.
d) Dramatify will display the content of the rundown and if the data quality looks good. Make sure you check that the CuePilot acts have the same number as the Dramatify scenes where they should be attached. Click “Import” if everything looks good. (You can always reset/change the import later, see below)
Alt 1 B. Updating a linked CuePilot shot list
When you want to update your linked CuePilot shot list,
a) click on the rundown menu and select “CuePilot import”.
b) then click on the blue button with “Refresh Cuepilot data”. Dramatify will display what is being refreshed.
c) Click “Import” to confirm to import the update.
Alt 2. Manually uploading a CuePilot shot list for an entire script
a) First, export the CuePilot shot list for your entire project according to the CuePilot instructions.
b) In your Dramatify rundown, click on the menu icon and select CuePilot Import.
c) Follow the instructions in the popup importer in the second half of the screen.
Alt 3. Manually uploading a CuePilot shot list for a single scene
There are two occasions where you might want to import or replace a shot list for a single scene:
- You only use Cuepilot for a single scene in your show
- You want to manually replace an already uploaded shot list, with a new version but do not want to replace the shot lists of all scenes.
To upload the shot list,
a) First export the CuePilot shot list for the relevant scene in CuePilot.
b) Go to the scene where the shot list should be added and click to edit, or add a new scene.
c) At the bottom of the scene editor, you’ll see a button marked “CuePilot act”. Click the button and follow the instructions in the import window.

Duration from CuePilot
Note that the duration from the imported shot list will replace any duration you have added to a scene in Dramatify.
This means that you will have the same timings in both systems and no mistakes are made.
Editing a CuePilot shotlist
You can do minor edits to an imported shot list, mainly in order to not having to upload a newer version for small changes. Note that the systems DO NOT synch and any changes will NOT be visible in Cue Pilot.
You can edit:
- Camera number
- Notes / Directions
- Lyrics
As you see in the image below, fields that can be edited is clearly marked in white.

Deleting/resetting a CuePilot shot list or all shot lists in a rundown
You can delete the shot list in a single scene as well as all of them at once.
To delete the shot list in a single scene:
- click on the edit icon (pen) for that scene
- find the shot list underneath the script content
- click on the trash icon to remove it

To delete ALL shot lists from a rundown, OR reset the CuePilot import to add another Cue Pilot project token.
- click on the menu icon (three bars) in the upper right corner of the rundown
- select “CuePilot reset”
- click “Yes, I’m sure” to delete all the shotlists
After deleting the shot lists, you can go ahead and replace them with a new version from CuePilot. Note that you may have to reload the web browser window if it looks like nothing has happened in the CuePilot import popup. That will refresh the data to the latest version.
STEP 1: Add a script

STEP 2: Rundown settings - select your content
On the script setting page, start with adding a title, and – if you like – script notes that are shown between the title and the rundown, then decide which information your rundown should contain. At the end of this section you will see all options in the rundown.
Settings for the rundown
Scene number and scene heading are default information. Synopsis will only be shown in scheduling and call sheets to differentiate scenes with similar scene headings.
Source is the source from where the content is coming; live, music, EVS, studio, speaker, and so on.
You can also add scene notes that will shown beneath each scene and where you can also add a thumbnail image.
Set and cast / character information is also available.
Settings for the content section
In the scene content section, you can show information in the order you like by selecting column order. You can also turn off columns that you don’t need. You can at any time add another content column, should you need it.
Note that if you turn off a content column it will not delete any content you might have put there, only hide it.
The content selections that will stay inline are:
- Action & Dialogue
- Camera
- Audio
- Graphics
- Screens #1-3
- Segment notes
The timing section
The timing section might need some explanation.
Scene length is self-explanatory while running time is all scene time added together, scene after scene so you can keep track of total length.
Instead of running time, you can use real-time. That means if you have a show starting at 8 pm, you can add that start time, and Dramatify will track at which time each segment should start – in real time. Say that the show starts at 8 o’clock at night with a 10 second intro, then a thirty-second promo of today’s show, followed by the 60 second opening scene.
Real time will then be:
- Intro: 20:00.10
- Promo: 20:00:40
- Opening scene: 20:01:40
You can also use reverse time to see exactly how much time you have left after each scene, that is, it counts the time backwards. To use reverse time, you need to know the exact total length of the finished material. Reversed time can be added after you have written the script if you are uncertain of final total length. When you are done with your settings, you just click save.
The interface section
In the interface section contains three settings:
- Icons on/off: In the action/dialogue column, formatting is proceeded by an icon indicating action, dialogue and optionally also camera. The formatting is necessary for a correct export to teleprompters, closed-captioning and subtitling. If you do not wish to display icons in the rundown, you can turn them off in the UX section.
- Editing content in the scriptwriting view or in the rundown: By default you can edit content (action and dialogue) in the scriptwriting view. To switch to the rundown (and thereby barring any users with permission to edit only the scriptwriting view to edit), just click to edit in the rundown.
- Lock scene edit: Do you want to lock down scenes if a person is already editing to prevent overwriting? If editing the rundown, the default behaviour is that Dramatify will warn you if somebody else already is editing a scene. Note! If you turn on “Lock scenes on edit”, if the person editing for some reason leaves their browser or computer without saving the scene, others may be locked out from editing the scene for a longer period. Therefore, this is not an ideal option right before a live show or broadcast. The scriptwriting view always is locked on edit, and does not support that multiple users edit at the same time.
Update comment
At the bottom of the script settings, you can add an update comment. It will be shown in the Update section and inform team members that you have changed the settings.
STEP 3: Write a scene
If you have just added a script, you will automatically be forwarded to the script page, and just click “Add scene” to begin.
If the script already has been added, you click on Scripts in the sidebar menu.
Start writing
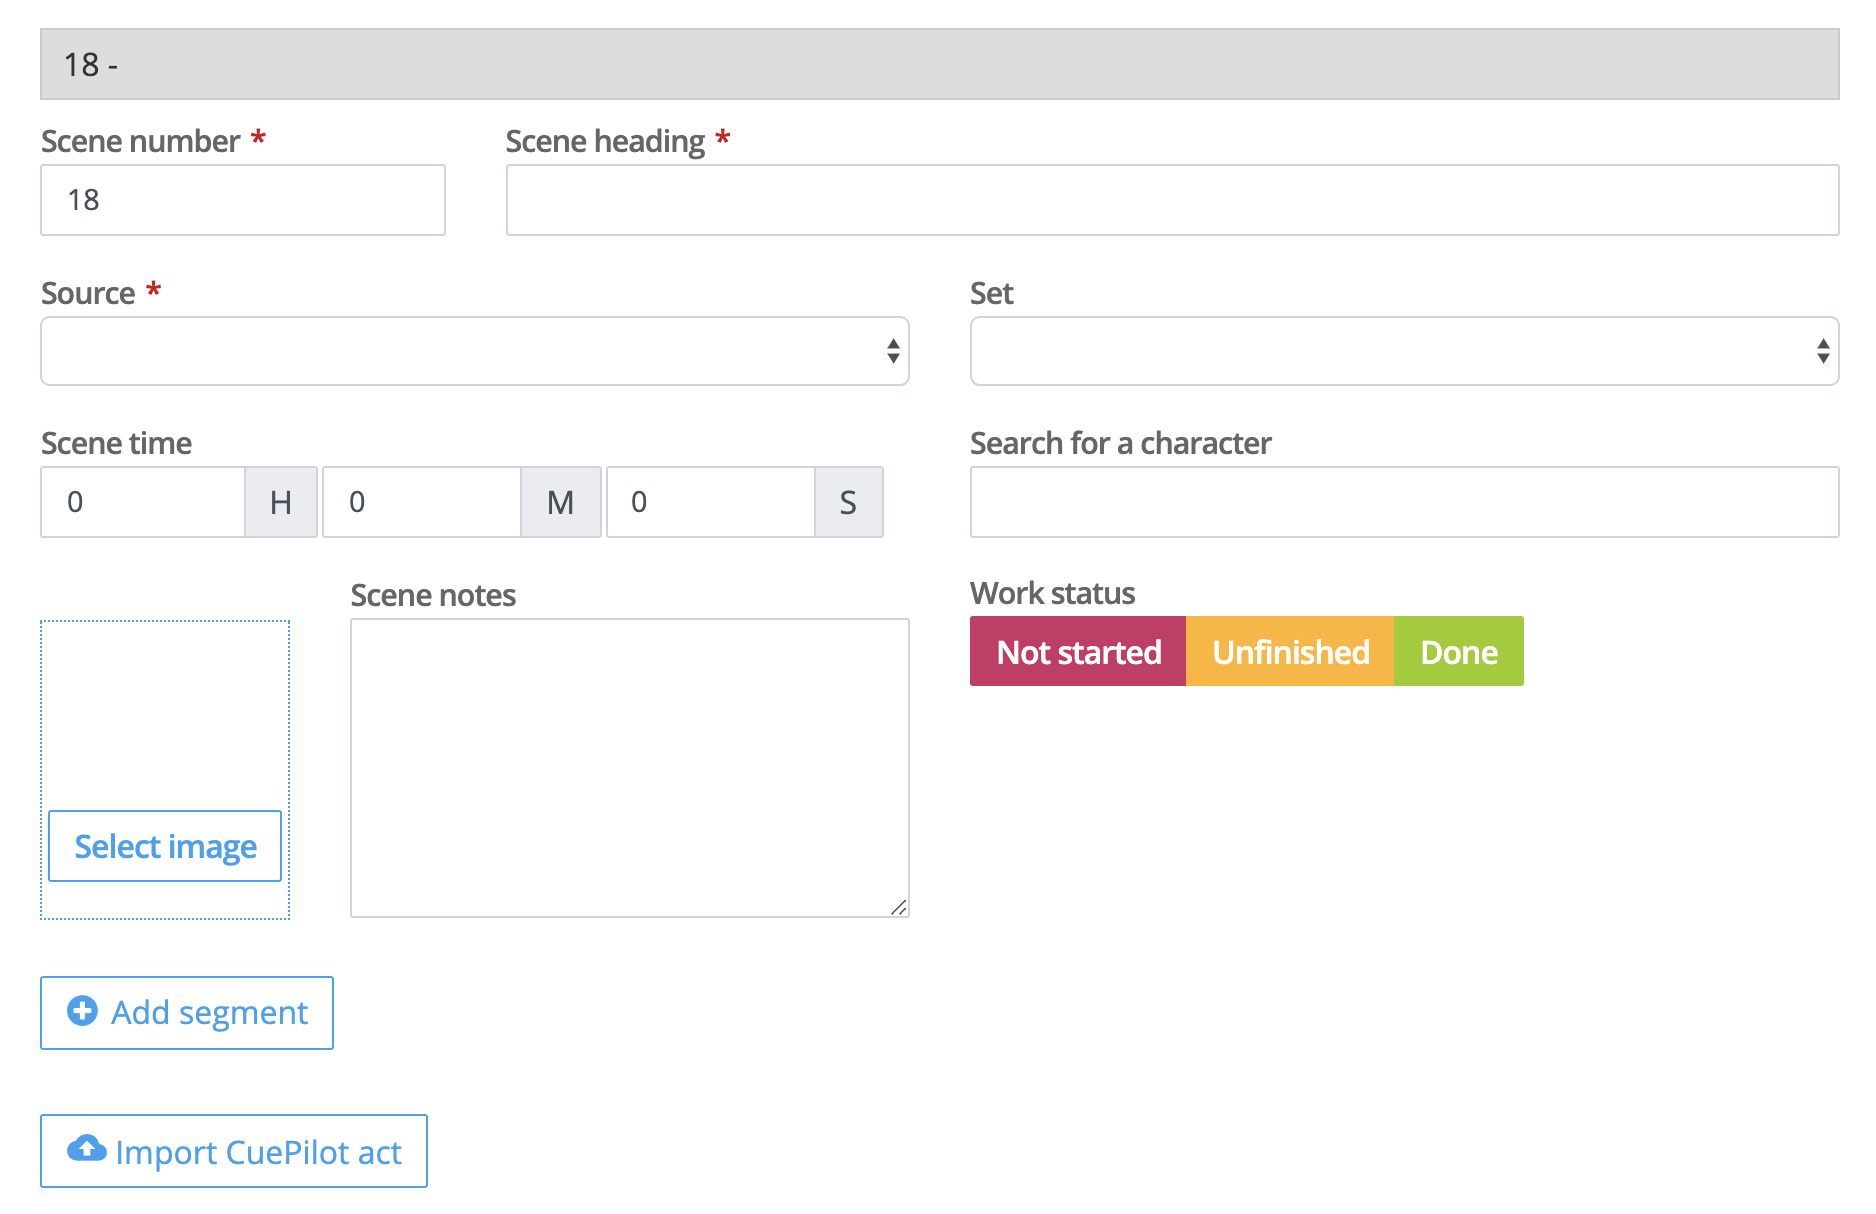
To start writing, add the scene number and the scene heading, then the other information – as much or as little as you need.
Add characters/cast and sets
To add characters/cast and sets to your production, you can either do it before or during writing by adding characters/cast and sets under Characters and Sets respectively in the sidebar menu. Learn more through our tutorials on Characters and Sets. When you have added Characters and Sets before writing a scene, you simply start writing the name and they will appear in the dropdown menus above.
You can also add characters/cast and sets, along with scene items, breakdown notes, and director’s notes, in the breakdown after your script is done. That is the most efficient method for larger productions. Learn more in our tutorial on breakdown.
Add scene content
To add scene content, click on the button “Add Segment“. The segment functionality allow shots and scene content to be kept inline with camera number and instructions, sound, graphics, screens and segment notes

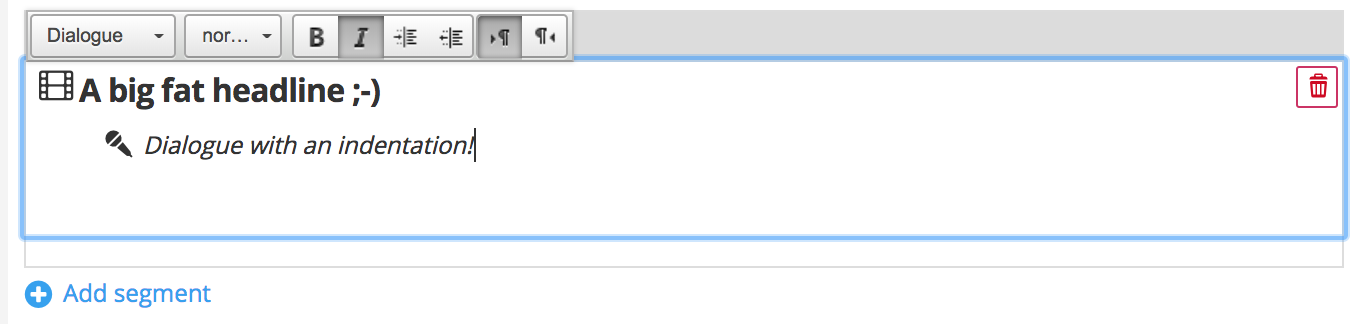
Click in the script text area to start writing. Now you will see the styles menu appear, where you can select Action, Dialogue or Camera. This will put an icon before any action, dialogue or camera instruction, letting team members know what each line is, but also selecting this content for later teleprompter export.
Note that you can turn off the display of icons in the script settings if you don’t want to see them.
Note that Camera instructions can either be added in its own column, in line with the Action & Dialogue column, or in the Action & Dialogue column. The first choice makes it easier for camera operators and other technical staff.
You can write without using the action and dialogue styles, but you will then not be able to select only dialogue for teleprompter export but will get all text. If you are using Cue Cards (see more below), dialogue WILL NOT be exported without the dialogue formating.
To add more action or dialogue, just hit enter and the marker be on the next line with a new icon in front of it. Use the styles menu if you want to switch from dialogue to action, or the reverse.
You then tab or click to add information to the camera, audio, graphics and screen columns.
Add typography
You have several typography selections if you want to format your text in a way that stands out. You can make the text bold or italic, make it bigger or smaller, as well as making indentations.
Move segments
To move segments within a scene, grab the cross in the left-hand side of the segment, and simply drag and drop in the new order.

RTL languages
If you write in a right-to-left language, like Arabic, Hebrew or Farsi, click on the right-to-left button to the right in the editor toolbar. As you see the cursor moves to the right-hand side of the textarea.

STEP 4: Editing a scene

STEP 5: Adding notes – both team and personal notes
There are FOUR ways you can add notes to your rundown!
Script Notes
The Script notes at the top of the rundown, between the title and the content. To add or edit the script note, click on the Notes button at the top of the rundown.

Scene Note
The scene note is places underneath the scene and may have a thumbnail image. It can be turned on and off by each user in the top Show/Hide controls.

Segment Note
A segment note is inline with each segment/shot. It’s one additional column that you can add in the scene settings. You can see it above as “New graphic file on the server!”
Personal non-printing note
If you want to add your personal notes that no one else can see, and that will not show up on printed copies, click on the scene to open it and scroll down to the bottom. There you will find the space for personal notes.

As you see below, the personal note appears in italics to separate it visually from the scene note.

STEP 6: Adding a new scene between two existing ones
Sometimes you realise that you have missed a scene, and need to add a new scene between two existing scenes. Just add a new scene and give it the scene number where you want to add it. All following scenes will be pushed down in order.
STEP 7: Copying a scene
You can easily copy or duplicate a scene by going to the end of the script and clicking on “Duplicate scene“.  In the drop-down menu, select which scene you want to copy.
  Then click “duplicate“.
  The duplicated scene will automatically get the last scene number. To add the scene between two previous scenes, just add which scene number the scene should have. All following scenes will be pushed down automatically.
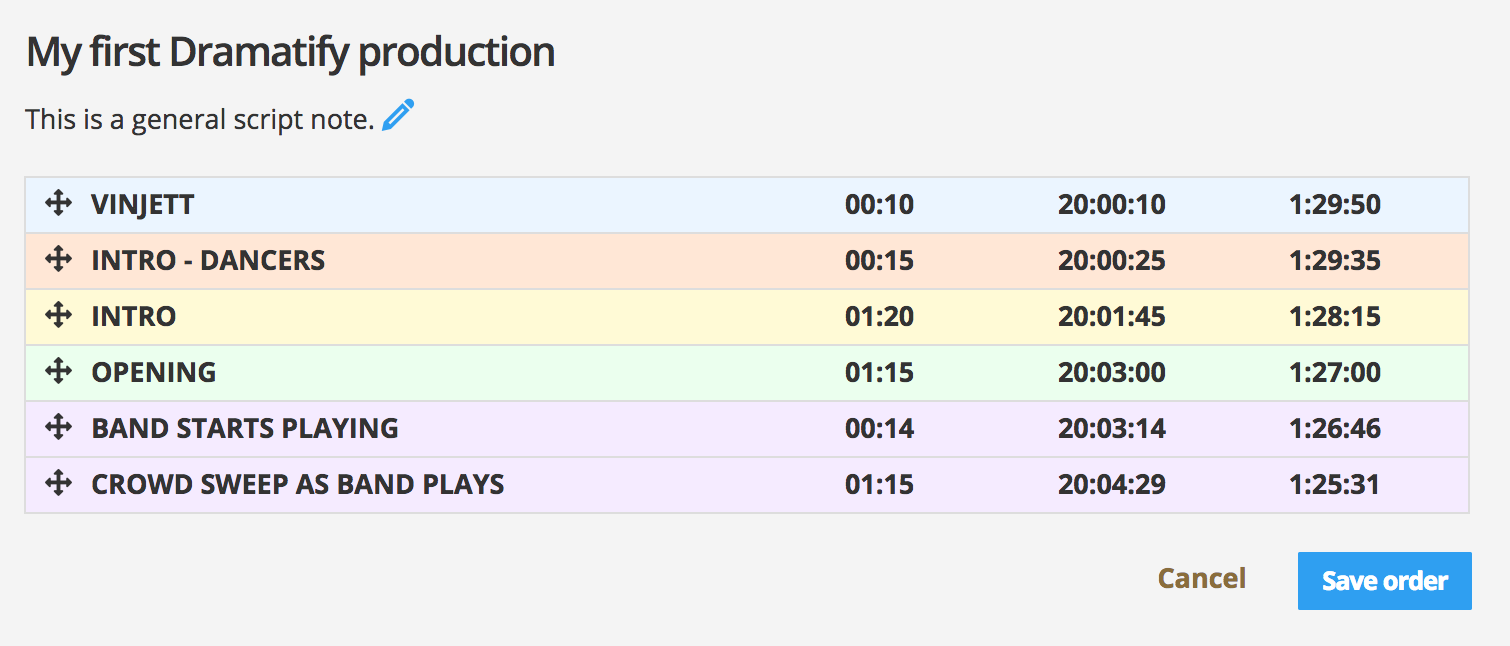
STEP 8: Re-ordering scenes
If you simply want to reorder scenes, or switch the order of two scenes, click on Reorder scenes. Here you can simply use the cross-shaped icon to drag and drop your scenes in the order you want them. Click to save the new scene order. 
STEP 9: Deleting a scene
To delete a scene, click on the pen icon. In the scene editor, click on the red “Delete scene” button at the bottom right of the editor. 
STEP 10: Deleting a script
To delete an entire script, click the Edit menu in the toolbar and select Script settings. You’ll find the delete button at the bottom right of the settings page.
STEP 11: Change script title
To change the script title, click the Edit menu in the toolbar and select Script settings. At the top of the page you can change the script title and then save the change.
STEP 12: Adding, re-ordering or removing columns in the script
To change any column settings in the script, click the Edit menu in the toolbar and select Script settings. Make the changes you want to the columns and save.
STEP 13: Printing the script
If you want to print a script, you just use the print command in the web browser. You can choose to print your script in portrait mode or landscape, and also if you want background colors or not.
STEP 15: Creating CueCards
In Dramatify, you can get integrated cue cards, both digital for tablets and smart phones, as well as print for several different paper sizes. You also have several fonts to chose between as well as different text sizes.
The cue cards features scene timings (as set in the rundown settings) as well as camera instructions from the camera column and dialogue. The printed cue cards also features Prodution Title, print date and time as well as page numbers.
Create Cue Cards
In order to get any content in the cue cards, dialogue you want in the Cue Cards must be formatted with the dialogue format (see above at “STEP 3: Write a scene”). Unformatted text, or text formatted as Action or Camera, will not be included.

Click on the menu button (three bars) at the top of the rundown, and select “Cue Cards”.
You will then be given the choice of either digital cue cards or printed cue cards.
Digital Cue Cards
Digital cue cards is created to be displayed on a tablet or a smart phone with a larger screen, but can also be viewed on a computer screen for rehearsals. The content adapts automatically to your screen size and screen orientation and features white text on a black bacgkround.

The result looks like below. You navigate forwards and backwards by swiping, and you can also jump by clicking on the jump menu.

Printed Cue Cards
The printed cue cards offers the same four fonts and the same text sizes as the digital version. In addition, you can also choose from five different paper sizes and printing options. Should you need additional paper sizes, let us know!

STEP 14: Exporting a telepromter feed
To export text to any teleprompter, click on the menu to the right (circled). 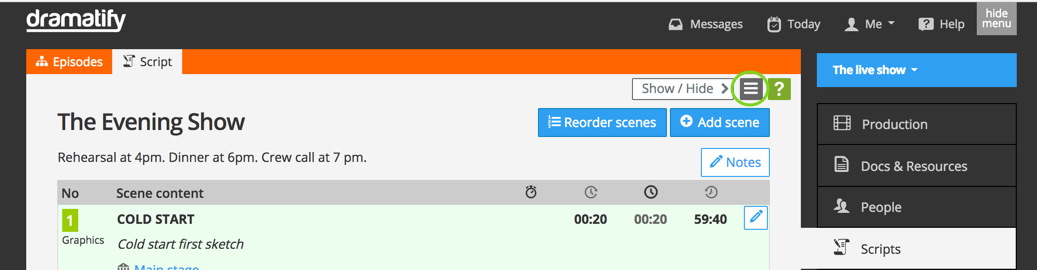 Click on the menu button and select “Export” in the menu (circled).
 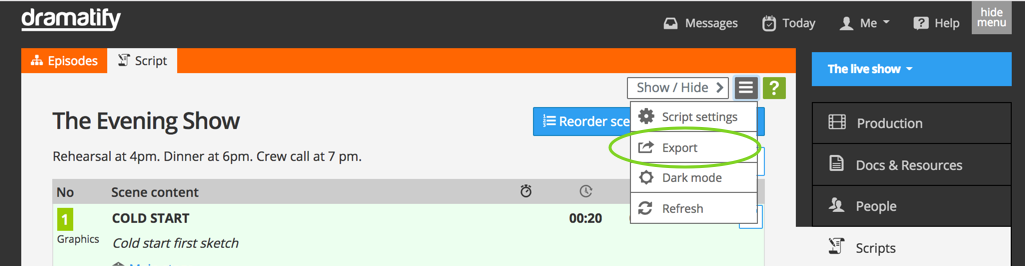 If you only want to export dialogue, check the box, otherwise, all script text with an action or dialogue icon will be exported. If text is missing in the export, you have not formatted it correctly with action or dialogue. Click “Export” when you have made your selection.
 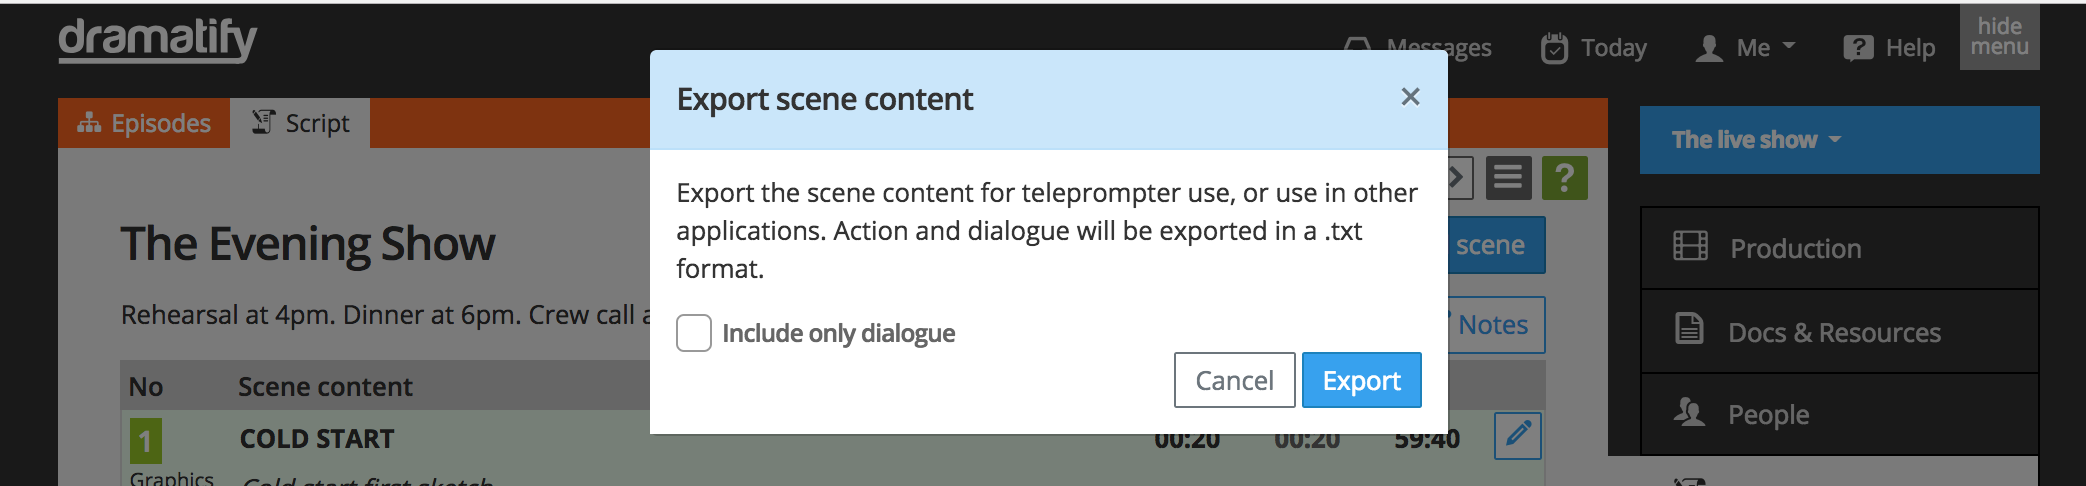 In the following window, right-click on the link and select “Save link as…” and save it on your computer. You have now a text file that you can import into almost any teleprompter.
STEP 15: Read-only rundown for users without a Dramatify profile
Sometimes there is no need for studio personnel or auxiliary staff like translators to be part of the production on Dramatify as they only briefly interact with the content. That is why you can create a read-only rundown accessible through a “secret” link or a QR code that access the link through the camera of a smartphone or tablet.
The link can be manually turned on and off, and you can also add a last valid date. Note that anyone with the (very long) link, never the less can read the rundown. If you are afraid that content may be accessed by unauthorised people, do not use this feature but instead require that all users are invited to, and logged into, Dramatify. Note that the read-only functionality for non-Dramatify users is only included for unlimited and enterprise plans.
In the rundown view, click on the menu icon and select “Share link”.

In the popup that appears, you can turn on and off the link as well as set a last valid date. The link can be shared with anyone, but the last valid date option means that you can add a last valid date and the link will shut down automatically so no content leaks by mistake. You can always open the link again but editing the last valid date or just switch it on manually.
- To share the link, you have three options:
- Copy the link and paste it into a message or an email
- Save the image of the QR code, or take a screenshot, and include it into a message or an email
- Open the popup on-site, and let studio staff use the camera feature on their phones or tablets, to capture the QR code and open the read-only rundown

Try Dramatify today - if you haven't already!
30 days free trial! No credit card required.