Scheduling & planning your production
Dramatify’s new planning suite gives you a variety of tools to plan your production, including drag’n’drop planning, calendar views, call sheet overviews and more. Here is how to use it!
Scheduling in Dramatify can either be done natively, as described below, or through the Movie Magic Scheduling import.
Where do I find planning & scheduling?
You find the planning & scheduling section in the sidebar menu under Planning. You need to have Admin permission in order to see the section. Under the Planning section, you find:
- Production overview
- Grid scheduler
- Production calendar
- Days out of Days for cast (moved to Cast & Characters)
- Crew scheduler (moved to People)
- Daily cast scheduler (moved to Cast & Characters)
- Movie Magic Importer (experimental)
- Call sheet creation and administration
Before you start: Production periods
 Setting production periods
 Setting production periods
When you first start a new production, you set the production periods. The production periods inform your team when the in development, pre-production, production and post-production starts and ends, as well as display in what stage the productions are on the Today page.
If you use episodes, you first set the overall production period of the entire production, then on each episode. This makes it easier to navigate episodes, especially if you produce a large number of episodes.
Editing production periods
Since production dates often change as planning progresses, you can easily edit production periods by accessing the Production nav tab and clicking on Settings in the orange toolbar.
Before you start: Add teams and/or episodes
Change or add teams and episodes
When you first add your new production, you will be asked to select which teams you want to have, as well as if you will use episodes or not.
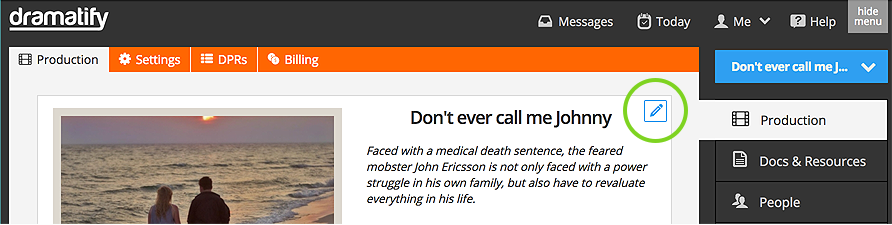
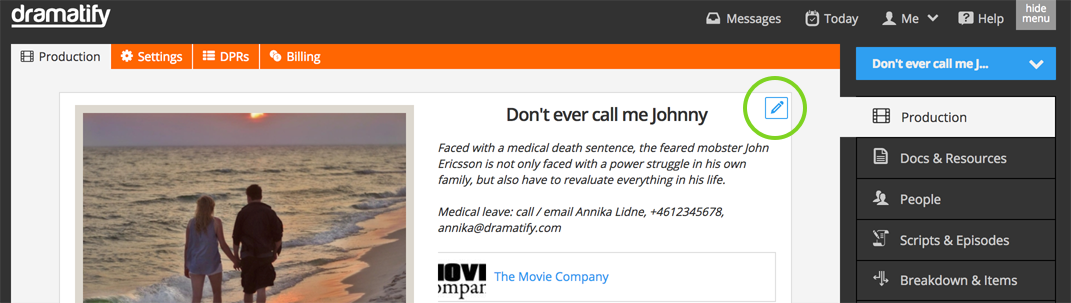
If you need to change these settings, go to the Production menu tab and click on the pencil icon to the right of the Production title.
You can add teams or turn on the multiple episode function at any time during the scheduling period.

Before you start: Breakdown
To successfully work with scheduling, you need to at least have done a minimal breakdown of your script. That means that scenes have the correct strip board colours in the scene list, because you have added sets, time of day and optionally also estimated segment and production time of the scenes. Adding characters also makes scheduling easier.
Before you start: The Stripboard Colours
Below you find the stripboard colours for drama screenplays and AV scripts. They build on the standard industry colours, but where they are lacking (dawn, morning, dusk, evening) we have added our own. Note that rundown stripboard colours build on the source colours.
|
INT. DAWN INT. MORNING |
EXT. DAWN EXT. MORNING |
||
|
INT. DAY INT. AFTERNOON |
EXT. DAY EXT. AFTERNOON |
||
|
INT. DUSK INT. EVENING |
EXT. DUSK EXT. EVENING |
||
| INT. NIGHT | EXT. NIGHT |
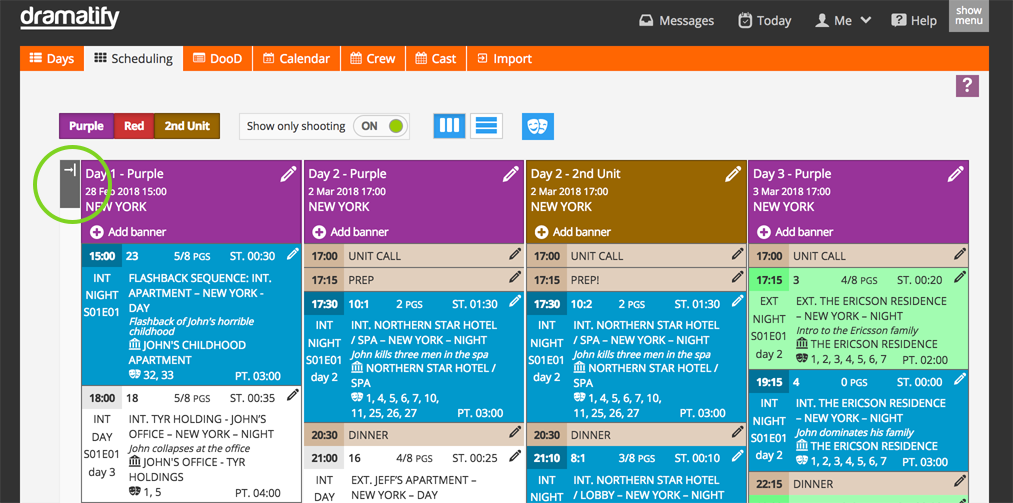
STEP 1: The overview page
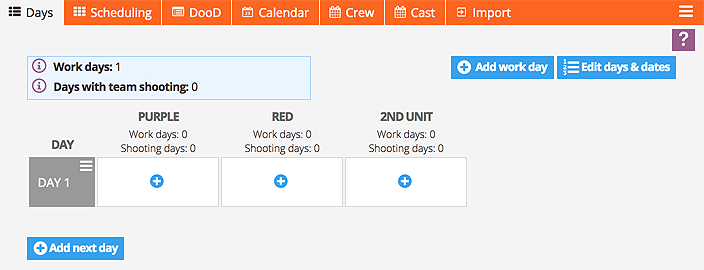
If you didn’t set up production days when you started your new production, Dramatify can add production days in bulk to get you started.

On the overview “Days” page, you have now added production days to your team or teams. You can att any time add another team or more production days, as well as delete production days if you added too many.

On the overview page, you will get an overview of your production and – later – access to all call sheets, published and unpublished, as well as an overview of which call sheets are published or not. The “boxes” per team as seen above, doubles as production days per team and call sheets.
An overview page can look something like this. The fully coloured boxes are call sheets published to the team, the striped boxes are call sheets not yet published and available to the team. This means you can pre-produce any number of call sheets ahead of time.

STEP 2: Add days to the production plan

When clicking on “Add work day”, you select “Add a new work day” and then add the day number, and if you like also the date. You can also add dates to production days later.

As you add production days, you get grid items for each team you added when you set up the production.

STEP 3: Production day / Call sheet types
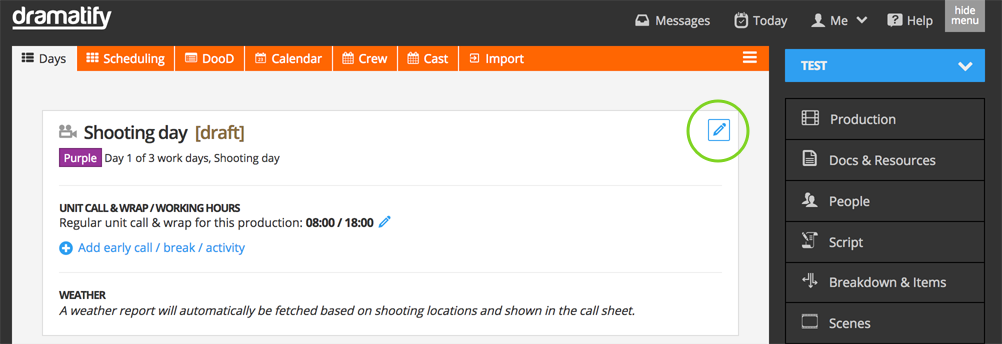
Click on the day and team where you want to add a workday, and select which kind of day it should be; Shooting day, Transport, Preparation, Holiday or Other.

You can also – if you want – add a title or flag. If you don’t add a title / flag, it will only state the activity; shooting day, transport, preparation, holiday or other.
Now you haven’t only started on a rough production plan, you have also added a call sheet template to each team and day.
The different call sheet types makes it possible for you to create a team that only deals with set construction for instance. They get their own call sheet of when and where they should be and what they should be doing. The call sheets for other tasks than shooting, are simplified call sheets, and we tell you more about those in the FAQ for call sheets.
STEP4: Adding working hours
In Dramatify, setting standard working hours for the entire production saves you a ton of time. You can always change working hours on individual days and teams, if you have a night shoot or staggered teams for instance. By adding standard working hours, you get:
- An automatic production schedule with times as you schedule your production, provided you have also added estimated production times in the breakdown.
- Working hours automatically added to the call sheets.
Setting standard working hours
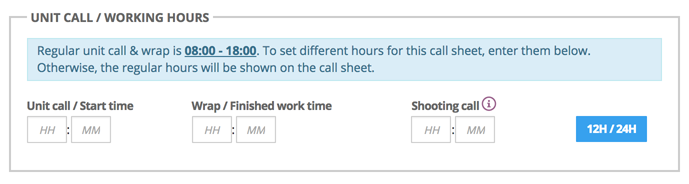
To set standard working hours, click on the Edit icon and select Settings in the toolbar menu.

Add Unit Call / Start time and planned Wrap / Finish time. Click on the 12 h / 24 h button if you’d like 12 hour time with AM / PM.

Setting different work hours on certain days and teams
You can set specific work hours on certain production days and/or teams, for example if you have night shoots, in two ways:
1. In scheduling: Go to Planning > Scheduling. Click on the edit icon on the day/team you want to change.

Add the new start time for the day. If you set the new start time in scheduling, you will also get a correct production schedule if you have added estimated scene time and estimated production time in the scene breakdowns.

2. In the call sheet: The second method to change the standard working hours, is directly in the call sheet.
Go to Planning > Days (the overview page) and click on the day / team you want to set the time for.
In the call sheet edit form, click on the edit icon.
In the middle of the page you can change the standard hours as well as time for the shooting call.
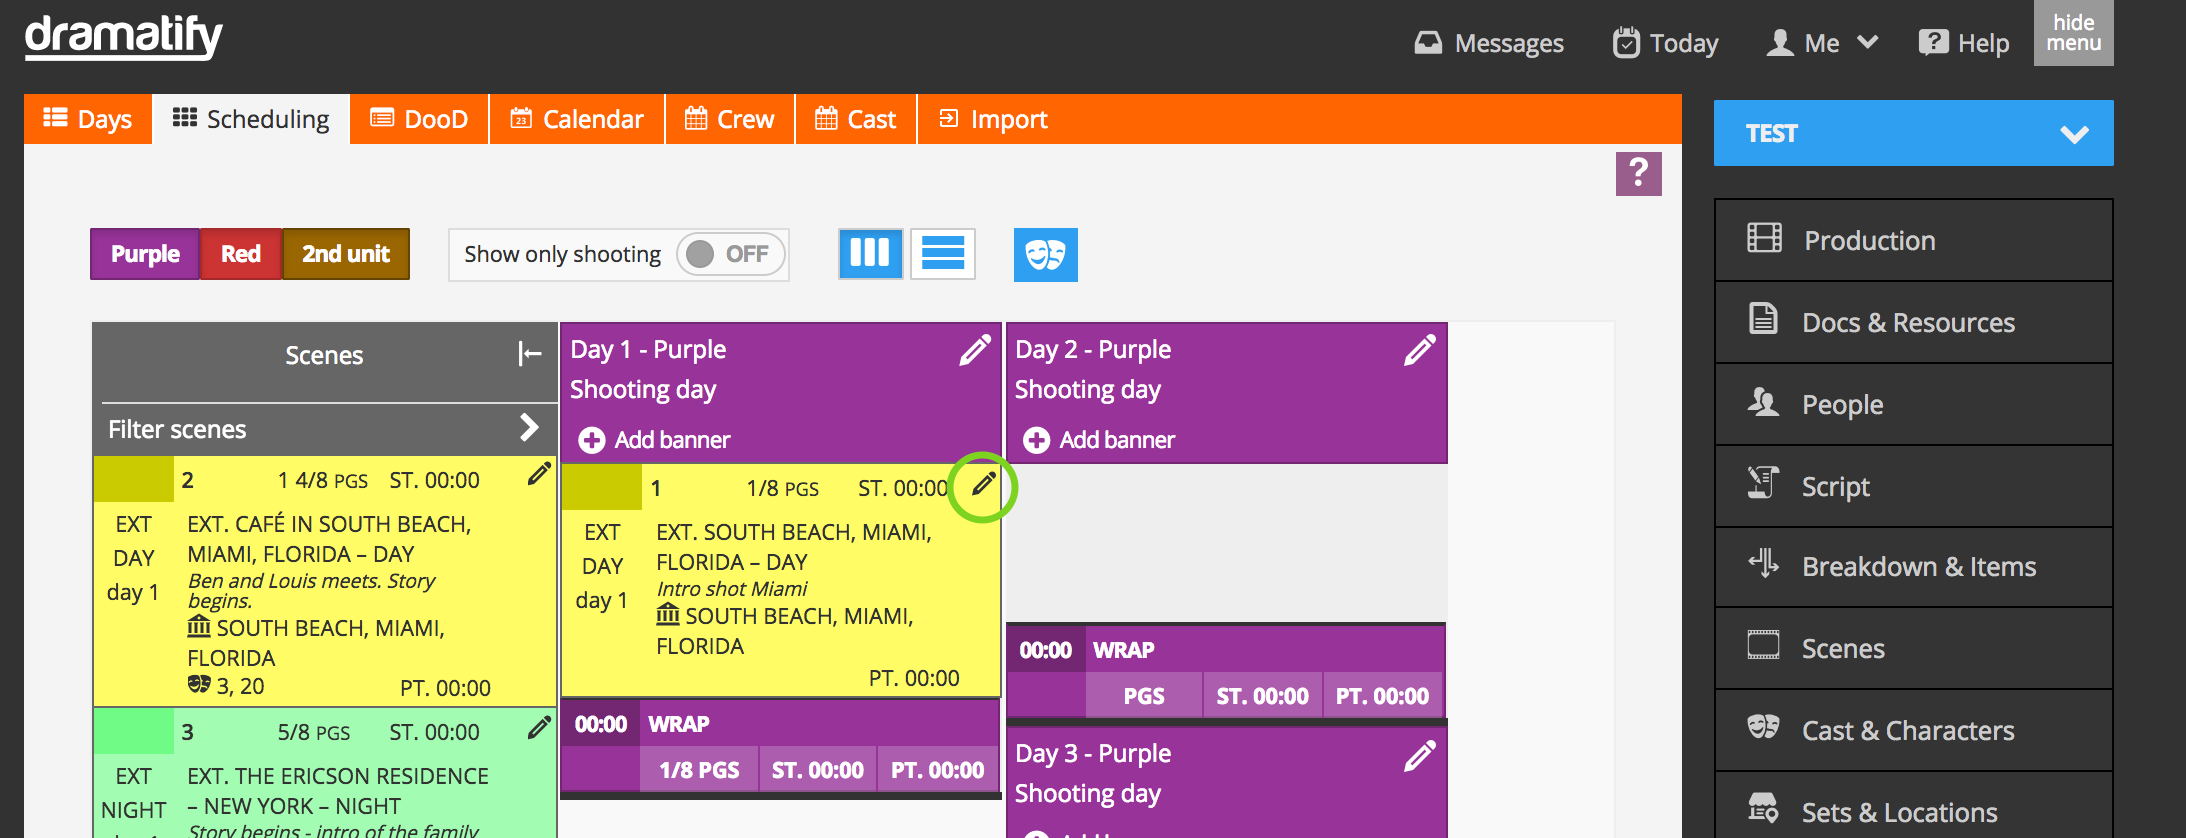
STEP 5: The scheduling controls and icons

The left hand column show all your unplanned scenes. It’s completely linked with your script and breakdown so it’s impossible to miss a scene. When this column is empty, you know that you have added all scenes and missed none. If a scene should be added after you have scheduled your shoot, it will show up here in the left hand column automatically.
Column view or stripboard view
Dramatify have two different scheduling layouts:
- The column view, shown above, which gives more overview
- The more traditional stripboard view, seen below, which some people find more familiar. Click on the icon for the horisontal stripboard layout to switch

Character number list
To minimise the space for each scene, Characters are numbered. Click on the Character icon to display the Character list.


Stripboard colours
The background colours corresponds to standard strip board colours if you schedule a drama or an AV-script: The strip board colours are as follows:
Dawn INT Dawn EXT Day INT (white) Day EXT Dusk INT Dusk EXT Night INT Night EXT
The stripe – a warning

Move scenes to the shooting day
To move a scene to the shooting day, move scenes with in a shooting day or move scenes between shooting days and/or shooting teams, simply drag and drop them where they should be. In order to avoid moving scenes by mistake, there is a slight delay, most noticeable on tablets and phones.

Hiding non-shooting days
As work days can be both shooting days as well as travel, preparation, holiday and others, the default mode is to see all of them so you don’t wonder where your prep days have gone. To hide non-shooting days, click on “Show only shooting”.

Hiding the scene list
If you want a better overview, especially on tablet or mobile, you can hide the scene list. Just click the arrow on top of the scene list to hide and show it.

To return the scene list, click on the same icon again:
STEP 6: Selecting an episode and filter scenes
Selecting an episode
If you work on a series, you can schedule all episodes together, or one at a time. To select an episode, click on the arrow to the right of “Filters”.
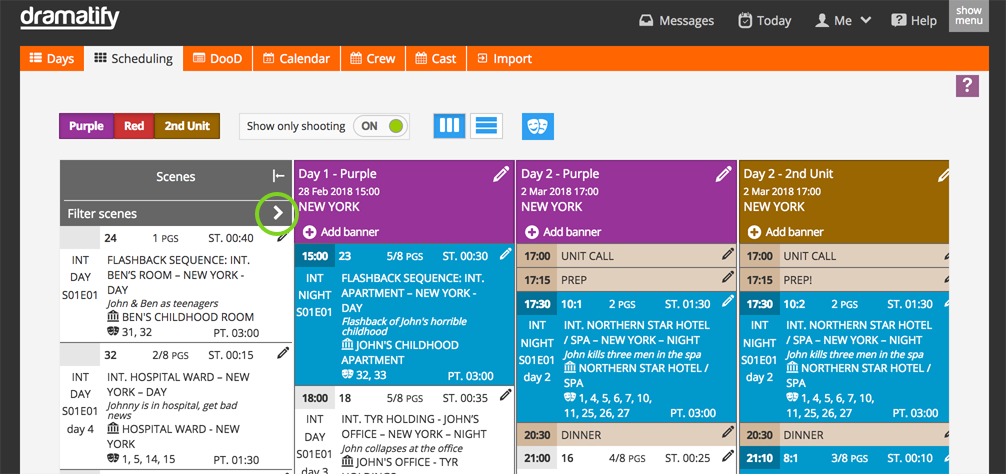
The filters allows you to see just certain scenes that
- belongs to a certain episode
- is INT, EXT, INT/EXT or EXT/INT
- uses a certain set
- is shot at a certain location
- is shot at locations around a certain unit base
- includes a certain character
or any combination of the above. This will make your scheduling much faster!

STEP 7: Schedule for teams
To focus on one team at a time, you can hide the other teams by clicking on them.

Add more teams
If you during scheduling realise you need to add one or more teams, click on Production in the sidebar menu and then on the edit icon beside the Production title.
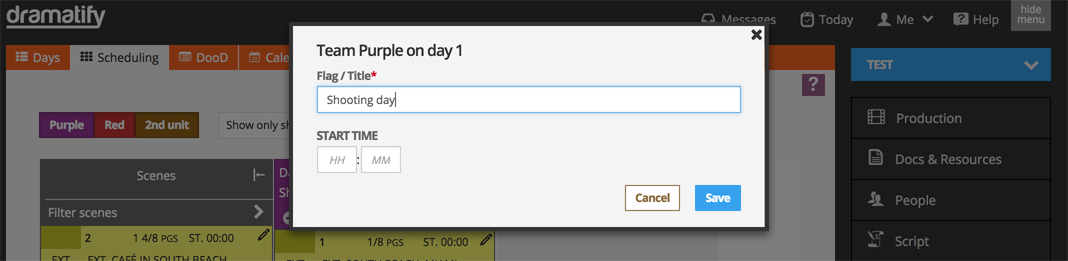
STEP 8: Adding flags
You can change the flags as you proceed in your planning.

Add or change the flag / title in the form:
STEP 9: Adding banners
Banners are automatically added to call sheets along with scenes for each day and team.

STEP 10: Start scheduling - adding scenes to production days

STEP 11: Move a scene

The numbers in the bottom of each column will be updated on the fly with:
- PGS = Total number of pages
- ST = Estimated total finished scene time / length
- PT = Estimalted total production time and work hours. Note that breaks are included if you set a time to banners.
Learn more about this in step 15.
STEP 12: Unsplit a scene
NOTE! The entire scene and its parts will now remove itself from the production day(s) where you have placed it and revert to the top of the left-hand scene column. To add it back into planning, just drag and drop it where you want it.

STEP 13: Remove a scheduled scene
To remove a scene from a production day, simply drag it to the scene list and drop it there.

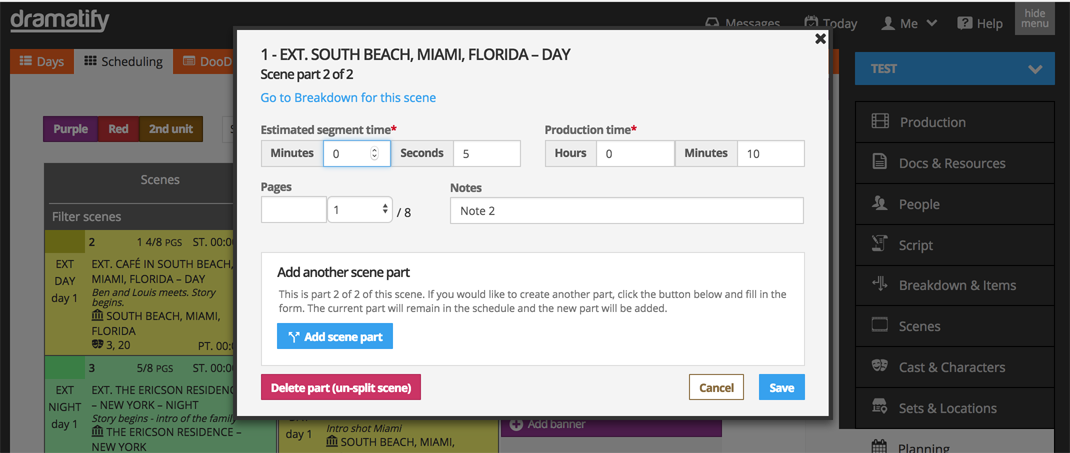
STEP 14: Split and/or revise a scene
In the scheduling, it’s just a click to change a number of scene details, as well as splitting a scene. Start by clicking the scene card edit menu icon.
In the popup form, you can now change the estimated segment time and production time as well as the number of pages. If you need to change any other information, just click the link to the scene breakdown.

To split the scene, click “Split” and a larger form will roll out as seen below.
You can split a scene as many times you need. For some productions, you just might want to split it to place a banner with lunch in the middle (more on banners above), in other cases a scene might need to be shot over several working days, or you might want to split the same scene on several teams. We increasingly see scenes that are created both by live action shooting and special effects teams.
Splitting times
A little heads up on split times: these are added together, so if the estimated segment time for the scene is 30 seconds the combined estimated segment time for the split scenes should also be 30 seconds; i.e 15 seconds each or however you want to split it.
If you’d like to split the scene three or more times, you just repeat the split on one of the scene parts.
When you have splitted your scene, just drag and drop the part where you like it, just like any other scene.

STEP 15: Estimate pages, working hours and finished material
STEP 15A: Adding dates with the calendar
Adding dates to shooting days using the calendar
There are several ways of adding dates to your shooting days.
USE THE CALENDAR: Click on Calendar in the orange toolbar. In the form at the top, simply select the production day and add the date it should be shot. You can then use drag’n’drop on desktop move production days around, or click and change the date on any device.
The other way to add dates to production days are to add them in bulk, see the next step 15B!

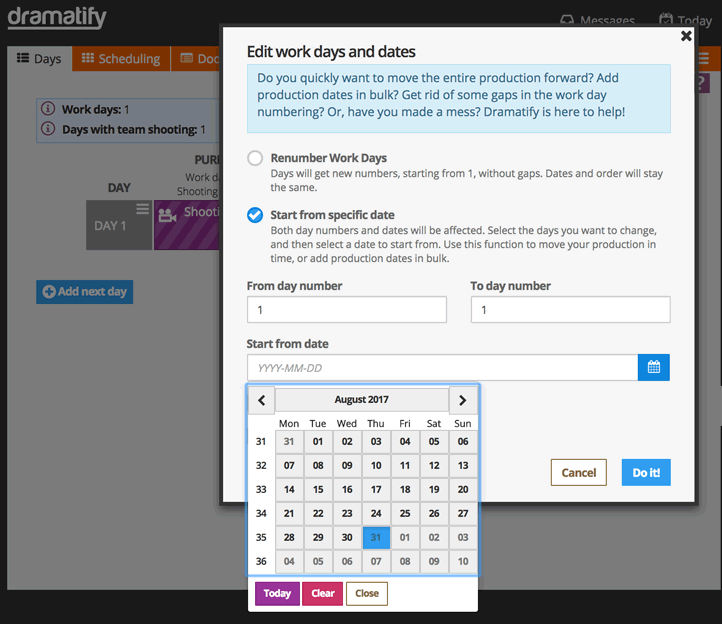
STEP 15B: Adding dates to production days in bulk
Adding dates to shooting days in bulk
Click on Days in the orange toolbar and you get to the grid overview. Click on the blue button “Edit days & dates”.
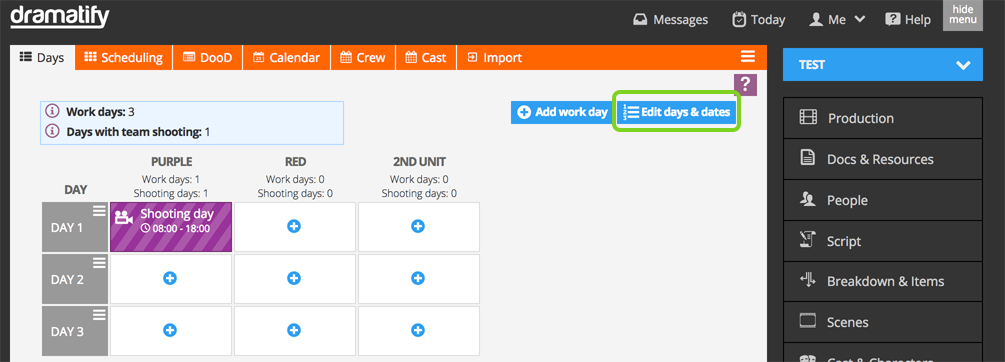
In the form, select the second option “Start from a specific date”

STEP 16: Add a new production day and insert it into an existing schedule
- First create a new production day by going to Planning. Click on the “Add Work Day” button.

- In the pop-up, select the second choice “Add and insert a new work day, and re-number all the following work days“. If you, as in the example above, want a new production day between production days 10 and 11, you number the new day 11 and the following days will be pushed one day ahead so it will be day 10, day 11 (the new day) and day 12 (formerly day 11). If you have added dates, these will be renumbered accordingly.


STEP 17: Swap production days
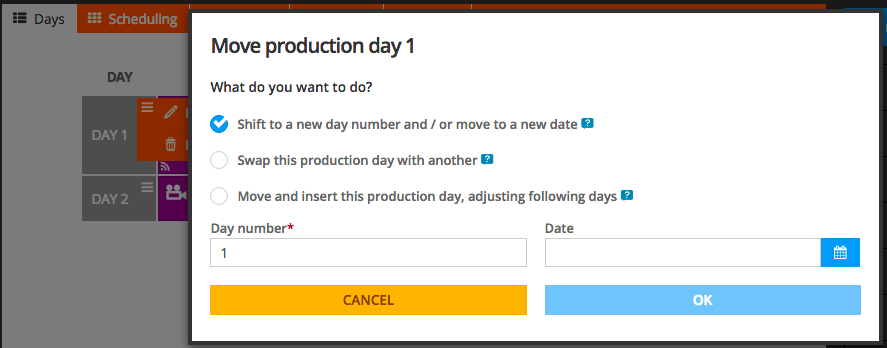
Swap production days
Sometimes you need to swap two existing production days, shift a day to a new date or move a day to a new date and adjust all the following days.
Just click on the production day edit menu, and select “Swap this production day with another“. Add the day you want to swap the day with and click OK.
This means that Production day 2 and Production 10 can swap places, but everything else is as before.
STEP 18: Move and insert this production day
Move and insert this production day
If you need to move a production day in between two existing ones, but keep everything else in the sale order as before, click on the production day edit menu, and select “Move and insert this production day, adjusting following days“. If you want to move day 10 to in between day 1 and day 2, you add day 2 in as the production day in the box.
Dramatify then moves it between day 1 and 2 and renames it to day 2, while renaming the former day 2 to day 3 as well as renumbering all following day and dates.
STEP 19: Moving an entire production in time
Moving an entire production in time
If your entire planned production got held up, and is moved – forward or backward – there is a simple way of moving it, provided that the production days are in sequence, i.e. not a weekly show.
Click on the “Edit days & dates” button , select “Start from a specific date” in the popup and enter the date you want the production to begin on. You can also create a gap in the production, say you want to move half of the production a month forward, you add the number of the first production day you want to move and then select the date it should be moved to. All following days are moved accordingly.
STEP 20: Delete a production day
Delete a production day
To delete a production day, just go to the Production day menu and click on “Delete”.
However, if you have call sheets added to your production day, i.e one or more teams have a coloured background, you must first delete the call sheets. You do that by clicking on the call sheet, and then on the call sheet editing page, click on the page edit menu in the right hand side of the toolbar and select “Delete call sheet”. When all call sheets are removed from a day, and only the blue links with standard team names are left, you can delete the production day.

STEP 21: The Day Out Of Days Report
The Day Out Of Days Report
You’ll find the The Day Out Of Days Report for cast by clicking on Cast & Characters in the sidebar, and then on DooD in the orange toolbar.
If you want to use it as a side-by-side planning tool as you schedule, you can open it as a second tab in your browser and update it as you schedule by clicking on Refresh in the toolbar edit menu.

STEP 22: Printing the stripboard

Top image by Maria Morri / Flickr (CC BY SA)
Try Dramatify today - if you haven't already!
30 days free trial! No credit card required.