
Master the invisible craft that keeps Hollywood running smoothly. Whether you’re a film student, a working writer, or importing a shooting script into Dramatify, understanding the American Screenwriting Standard is essential. Proper formatting isn’t just about looking professional—it ensures that every scene, move, and rewrite is recognised correctly by people and software alike, keeping your production workflow flawless from draft to shoot.
What is the American Screenwriting Standard?
The American Screenwriting Standard (also called “master-scene format”) is the industry-accepted layout for U.S. film screenplays and TV scripts. It mandates 12-point Courier on US Letter paper, strict scene headings (sluglines) like INT. OFFICE – DAY in ALL CAPS, and only six element types: Scene Heading, Action, Character, Parenthetical, Dialogue, and Transition.
Characters’ names are in UPPERCASE (often centred) above their indented dialogue lines. Following this format ensures a clear, consistent script that can be timed correctly (1 page ≈ 1 minute of screen time) and that production tools can read correctly.
Script import: Correct formatting is crucial
Correct formatting is crucial when importing screenplays. In Final Draft or similar software, use the built-in styles (Scene Heading, Dialogue, etc.) instead of manually bolding or uppercasing. For example, a slugline must use the Scene Heading style, not just bold text, or import tools may misrecognise it. Always apply INT./EXT., location, and time-of-day as a properly formatted heading.
Before exporting your .fdx, rebuild your program’s character/set lists (e.g. Final Draft’s SmartType) so names import cleanly. If headings or breaks are wrong, Dramatify and others will flag “ghost” scenes. In short, use your screenwriting app’s formatting rules and preview the output to catch any errors.
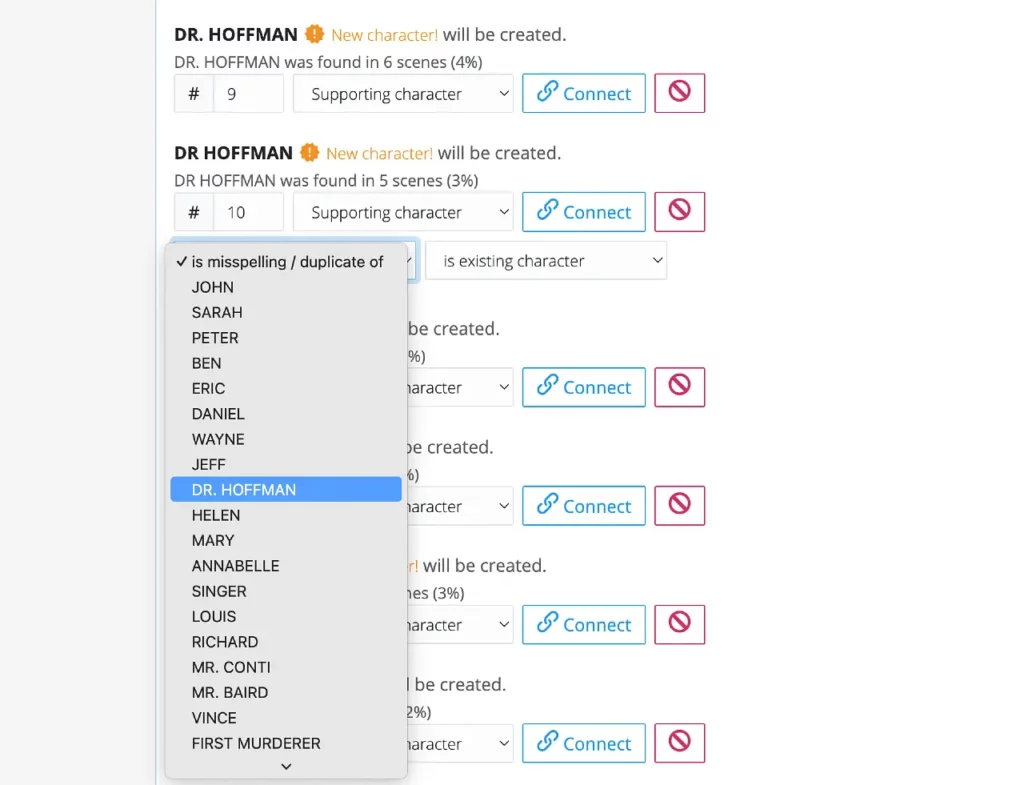
During import into Dramatify, you can merge duplicate and mispelt characters and sets.
Numbering, Moving & Deleting Scenes
The American Screenwriting Standard has rules beyond formatting, all to encure clarity and to make it easy for the production team to track progress.
In a shooting script, scenes are numbered sequentially (1, 2, 3…). When revising, do not renumber all later scenes. Instead, insert letters. For example, a new scene between 1 and 2 is numbered 1B (then 1C, 1D for additional inserts). To move a scene, keep the original number but mark it omitted and give it a new letter at the new location.
For instance, if scene “34. INT. OFFICE – DAY” moves to slot after 36, first change the old heading to “34. SCENE OMITTED – moved to 36B,” then paste the scene with the heading “36B. INT. OFFICE – DAY”. Likewise, always retain the old number on any cut or moved scene so the team sees what happened. If you delete a scene, replace its slug with “SCENE OMITTED” and remove the action text. (Sometimes “DELETED SCENE” is used in production to similar effect.) This way the scene count has no unexplained gaps. Simply deleting content without note can confuse readers and break scheduling tools.
- Insert a scene: Add a letter after the previous scene’s number. E.g. between scene 10 and 11 use 10B; another after that is 10C.
- Move a scene: At the original spot, keep the old number but retitle the heading “SCENE OMITTED – moved to X” (or similar). Paste the scene at its new spot with the prior number + letter (e.g. 36B if moving after scene 36). Use 36C, 36D, etc. for multiple moves after the same scene.
- Delete a scene: Keep its number and change the heading to “SCENE OMITTED” (removing the dialogue/action).
...
1.  INT. APARTMENT – NIGHT
1B. EXT. FIRE ESCAPE – NIGHT   <— inserted between 1 and 2
2.  INT. HALLWAY – NIGHT
...
34. SCENE OMITTED – moved to 36B

36B. INT. OFFICE – DAY
(Contents of the moved scene)
27. SCENE OMITTED
Numbered scenes also help automation. Dramatify and Final Draft sort scenes by their numeric value, so failing to renumber will misplace your scene. For example, if scene 146 is moved between 90 and 91 but left numbered 146, it will still appear after 145 in the running order. Always insert the letter immediately to lock the story order. Consistent numbering also makes syncing rewrites easy: each revision (page-turn) is color-coded (pink, blue, etc.), and matched scene numbers keep the new pages aligned with the old.
Importing and Revisions
When you import a screenplay (.fdx) into Dramatify or other tools, follow the on-screen steps carefully. After uploading, Dramatify lists characters, sets, and scenes. Rebuilding SmartType (as above) ensures characters and locations link to your scenes and that you do not import outdated scene information.
Importantly, don’t rely on Dramatify to guess formatting errors – clean them up in the .fdx first. This avoids issues like “garbage scenes” showing up, that you have one (1!) scene in a 90 page script or that your screenplay simply refuses to import correctly because your have four scenes with the same scene number. In a rewrite, Dramatify will match scenes by number/letter; if you’ve followed the American standard rules above, it will synch smoothly with your new pages.
Cover Page and Title
Finally, remember that the cover (title) page is not imported from .fdx. According to the American Screenwriting Standard, the title page is a separate page with a simple layout: the script title centered in all caps (about 1/3 down the page), writer credit (name, draft date) below it, and your contact info (or production company info) at the bottom corner.
Dramatify lets you fill in these fields so it can generate a “cover page formatted as per American Screenwriting Standard”. (For example, your name might be right-aligned, your agent’s info centered, etc. – the exact style is standard.) After importing your script, be sure to create or update this cover page so that anyone printing or reading the script sees the correct title and writer info in the proper format.
Following the American Screenwriting Standard – consistent sluglines, Courier font, scene numbers with letters for insertions/moves, and marking omitted scenes – ensures clarity for everyone. These conventions are used across Hollywood and TV (as documented in screenwriting guides), so using them makes your screenplay “speak the same language” as producers, directors and tools like Dramatify. Always apply your software’s formatting features and double-check scene numbers during rewrites. With that discipline, you’ll avoid formatting headaches and keep your production import running flawlessly.
Major rewrites: when to reset a project
If your screenplay has been substantially re-outlined or re-ordered (e.g., many scenes moved/omitted/inserted across the script), legacy IDs and metadata can become noisy and confusing. In those cases, it may be clearer and safer to reset your Dramatify project’s script content and perform a clean import.
Recommended workflow:
- In Dramatify, go to Project → Settings → Delete content from project. Delete the rewritten script or scripts. (use with care).
- Use the SmartType feature in Final Draft to rebuild your script file and avoid importing old information.
- Number your scenes before import.
- Re-import the updated
.fdxand verify numbering and scene recognition.
Only perform a reset when a clean slate will avoid greater confusion and errors down the line.
Troubleshooting checklist
A. Common issues with the American Screenwriting Standard in digital workflows
- Manually styled headings: Slug lines typed in ALL CAPS/bold but not set as “Scene Heading” fail to import as scenes. Fix: Reapply the proper element style.
- Inconsistent scene numbering: Duplicate numbers, skipped numbers, or renumbering everything each draft. Fix: Maintain base numbers; use lettered inserts (1B, 1C…). Use “SCENE OMITTED” for removals.
- Mixed or drifting character and set names: “MOM” vs “MOTHER”, “Jon” vs “John”. Fix: Use the Character feature in step 2 of the importer and merge characters. Do the same to set names in step 3.
- Bad line breaks/indents from copy-paste: Hidden tabs/spaces break parsing. Fix: Re-enter with the correct element style; avoid pasting from rich-text sources.
- Transitions misused as headings: “CUT TO:” typed where a scene heading should be. Fix: Use Scene Heading for locations; keep transitions minimal and in the Transition element.
- Title page issues: Missing or mis-placed credits/contact. Fix: Fill in title page fields after import per house style.
B. Numbering integrity: quick self-audit
- Scroll your script’s scene list: do numbers increase monotonically?
- Are inserted scenes lettered (e.g., 12B, 12C) rather than forcing a global renumber?
- Are deleted scenes marked “SCENE OMITTED” (no gaps that look accidental)?
- If you moved a scene, did you mark the original slot “SCENE OMITTED – moved to X” and create the new lettered number at the destination?
- Do any two scenes share the same number unintentionally? If yes, resolve by converting the later one to a lettered insert or renumbering the local block.
C. Import still looks wrong?
- Re-export a clean
.fdx: After fixing styles/ - Check for “ghost scenes”: If a break imported mid-paragraph, you likely had a stray heading. Merge or delete the accidental scene and correct the source.
- Massive structure changes? Consider the reset workflow in the section above to prevent legacy artefacts from polluting the new structure.
Happy writing!
0 Comments